1-248-887-3187

Weekdays 9AM - 5PM EST

Mobile Home - Manufactured Housing - RV

×
Home / Anchors / Anchors & Tie Downs

Mobile home anchors and tie downs

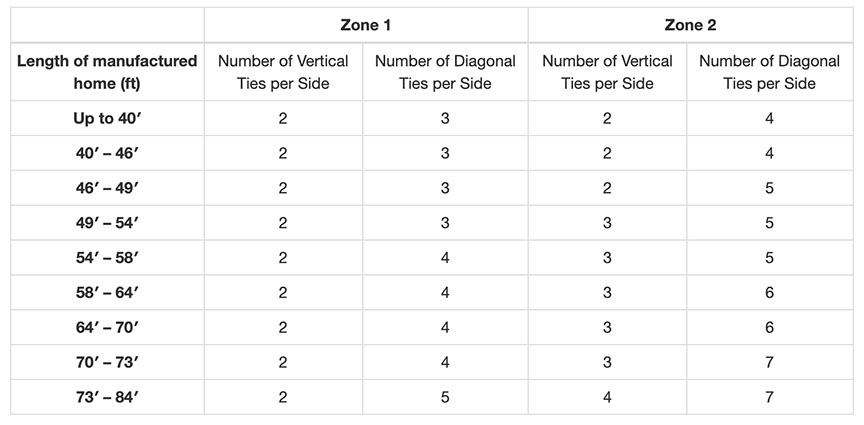
When strong winds blow, manufactured homes need special protection. No matter where you live, you need tie-downs and anchors to keep your manufactured home stable and secure. Before you start the job, you should understand why this wind protection system is necessary, and know the basic requirements for tie-downs and anchors. You also need to become familiar with all the components that make up your anchoring system. It's a good idea to consult with an experienced professional installer or building inspector if you have any questions or doubts about the installation.

Manufactured homes must have anchors and tie-downs to keep them in place during high winds. Compared to site-built homes, manufactured homes are relatively lightweight. They have flat sides and ends, and they are built on frames rather than foundations. Almost all manufactured homes are elevated, situated on top of some sort of pier or foundation system. Wind can get under the homes and lift them up. In addition, the wind passing over the top of your manufactured home can create an uplift force. To resist wind forces, you need two different types of tie-downs. In older homes, a vertical or over-the-top tie-down is needed to compensate for the uplift force. A diagonal or frame tie-down is needed to compensate for both lateral and uplift forces. Singlewide manufactured homes need both types of tie-downs. Doublewide homes only need the diagonal ties.


To determine the length, do not include the draw bar.

Numbers based on minimum working load per anchor of 3,150 pounds, with a 50% overload of 4,725 pounds.

Diagonal ties must deviate at least 40 degrees from a vertical direction.

If your home has special site considerations, a registered professional engineer or architect can devise an alternate anchoring system.


Anchoring system components

Types of tie-downs

You'll find anchors available for different types of soil conditions, including concrete slab. Auger anchors have been designed for both hard soil and soft soil. Rock anchors or drive anchors allow attachment to a rock or coral base. This type of anchor is also pinned to the ground with crossing steel stakes. If you will be pouring a concrete base, you can install a concrete anchor first.

You need to know your soil type to select the right anchor. Soil classifications usually include: rock/hard pan, heavy, sandy gravel, heavy sand, silty gravel, clayey gravel, clay, silty clay, clayey silt, uncommitted fill or peat/organic clay.

Whatever type of anchors you select, carefully follow the installation instructions. Auger anchors (screw-in anchors) can be installed manually by inserting a metal bar through the top of the anchor for added leverage or with a machine designed for this purpose. It's important to screw this type of anchor in. Do not dig a hole to install.


Hook-up and tension device:

The tie-down must be connected to the anchor with a system that allows for adjusting the tension. It must also be weather resistant and strong enough to support as much weight as the anchor and tie-down. If the tie-down is fastened to a ground anchor with a drop-forged turnbuckle, the turnbuckle should be ½ inch or larger galvanized steel. The turnbuckle should have forged or welded eyes, not hook ends.


The roof protector

If you have exposed over-the-top tie-downs, you must have some sort of roof protectors placed under the strap or cable at the edge of the roof. Roof protectors are also called roof brackets, buffers or thimbles. These prevent the tie-down strap or cable from damaging the roof and will prevent the edge of the roof from cutting through the tie-down. Wood blocks will work, and are better than nothing, but commercial protectors will do a better job of distributing the pressure of the cable. Commercial protectors will last longer, too.


Specifications

Make sure all your anchoring equipment (anchors, turnbuckles, straps, hookups) is capable of resisting an allowable working load of at least 3,150 pounds. The equipment must also be capable of withstanding a 50 percent overload, 4,725 pounds. This also applies to the attachment point on the manufactured home. Only use anchoring equipment that is weather and corrosion resistant. YOU MUST ALIGN EXPOSED OVER-THE-TOP TIE-DOWNS WITH A ROOF RAFTER TO PREVENT DAMAGING THE ROOF.

Tie-downs can be either cable or strap. If cable is used, it should be galvanized steel or stainless steel. Minimum diameter size is 3/8 inches for 7 x 7, or ¼ inch for “aircraft” cable, 7 x 19. If flat steel strapping is used, it must be a minimum of 1-¼ inches wide x .035 inches thick.


Tie-down and anchor installation

Installing a tie-down and anchoring system is not too complicated for most do-it-yourselfers. It's wise, however, to seek experienced help to make sure you are using the proper anchor for your soil conditions, enough anchors for your wind conditions, the correct tension on your tie-down, and proper angle for your frame tie-downs. At the very least you should have a building inspector or a trained installer check over your finished work.


Step 1: Level house

Make sure your home is level before anchoring it to the ground.


Step 2: Check charts

Check the wind zone chart for your location and determine the required number of anchors recommended for your zone. You should regard this number as the minimum needed for your home.


Step 3: Determine soil type

Merely looking at the ground under your home isn't enough. Some types of anchors need to be installed five feet deep. Talk to a building inspector to determine your soil type. If you will be attaching your tie-downs to a concrete foundation, make sure it is at least 4 inches thick.


Step 4: Select anchors

Talk to a supplier or installer for advice. Your soil type will determine the type of anchor.


Step 5: Select hook-up

Depending on your tie-down system, over-the-top or frame, select the appropriate hook-up and tensioning device. Make sure the entire system is certified to a 4,725 pound capacity.


Step 6: Locate wires/cables

Mark the location of your electric, cable, gas, water, sewer and phone lines on the ground before you install anchors. Make sure you have located everything prior to digging.


Step 7: Position over-the-top tie-downs

If you are installing an exposed over-the-top tie-down, the strap or cable should be positioned over a roof rafter. Protect the edges of your roof with a roof protector of some type. Make sure the strap or cable does not cover a window or door.


Step 8: Install anchor

You'll find specific installation instructions with your anchor. Follow them carefully. For a vertical tie-down, the anchor is installed vertically.

For a frame/diagonal tie-down, the anchor can be installed to the same angle as the tie-down. This angle should be at least 40 degrees. The anchor can be installed vertically if you also install a stabilization device to keep the anchor from moving sideways. A metal stabilization device can be attached to the top of the anchor and buried in the ground. Another option is to pour a concrete collar around the top of the anchor. The collar should be at least 10 inches in diameter and 18 inches deep.


Step 9: Adjust tension

Alternating from side to side, adjust your tie-downs to the appropriate tension. Don't do one side of your house and then the other.

Remember: Anchoring and tie-down systems vary greatly. It's important for you to contact the local building inspector for regulations regarding anchoring and blocking installation in your community. Regulations vary considerably from one community to the next. In some states, tie-downs aren't required. In other states, tie-downs are stringently regulated and inspected.

To make sure you're tied down safely, consult your local building inspector.